100 Days at Sea Items, Structures & Companions — Verified
Everything below comes from cross-checked sources — recipes single-sourced from a tested guide are marked, and invented numbers from fabrication-prone sites are left out entirely.
100 Days at Sea items: starting kit & consumables
Your signature tool — hooks floating resources (and birds) out of the sea. The whole early game runs through it.
Starting item for food from day one.
The serious heal. Four verified sources — Medic class, Mukumuku Market, Cargo Ship containers, Snorflord — detailed on the revive page.
The light heal; the Penguin companion prints one every 220 seconds.
Redirects the Angler Fish — the one tool that answers the night hunter directly.
Harpoon a bird, cook it — one of the biggest satiety restores in the game.
Structures (recipes per Pro Game Guides' tested guide)
| Structure | Recipe | Why it matters |
|---|---|---|
| Sawmill | 10 Wood + 2 Metal | Unlocks at Bonfire level 3; converts wood into 3 planks per cycle. Experienced players run two. |
| Crab Trap | — | Passive food generation — set it and forget it. |
| Magnet | 30 Metal + 10 Wood | Unlocks at Bonfire level 4. Pulls in metal continuously — effectively infinite metal from then on. |
| Map Radar | — | Reveals the full map and marks islands. |
| Auto Turret | — | The solo player's raid insurance — automated defense for nights you can't cover alone. |
| Bonfire | — | The progression gate itself: leveling it unlocks structures, and keeping it lit keeps the Angler Fish away. |
Where these percentages come from. All of them are Roblox's own public badge counts for this game, read on 2026-09-01, divided by the 90,280,294players who hold "Out At Sea" — the badge you get for launching the game at all. Roblox awards badges once per player for life, not once per run, so these say how many people have ever reached a milestone, not what fraction of runs succeed.
Recipes marked "—" haven't been documented by a trusted source yet; the in-game build menu shows requirements directly. We don't reprint numbers from sites with a fabrication record.
100 Days at Sea build order — what to make first and why
A recipe list tells you what a structure costs. It does not tell you what it is for, or in what order the costs are worth paying. This is the order the verified material actually supports, with the reasoning attached to each step rather than left implied.
- 1Harpoon everything (from minute one)
The starting tool is the whole early economy — planks, furniture, crates, birds. It is also one of the most widely-earned badges in the game: 77.2% of players who hold the entry badge have also hooked an object — behind only lighting the Bonfire itself. If you are short on materials on Day 2, you are under-harpooning, not unlucky.
- 2Sawmill — 10 Wood + 2 Metal
The first structure that changes the shape of a run. It unlocks once the Bonfire hits level 3 and converts raw wood into 3 planks per cycle, and the tested advice is to run two of them rather than one. Slow planks are the single biggest early bottleneck, and a second Sawmill is cheaper than the days you lose waiting.
- 3Crab Trap — passive food
Set it once and hunger stops being a daily decision. It is the difference between fishing because you want to and fishing because you have to.
- 4Cooking pot — chowder
A structure the guides skip entirely: the official badge list confirms a cooking pot and a chowder recipe, and 28.1% of all players have cooked their first bowl. Pair it with Cooked Bird — harpoon a bird, cook it — for the biggest satiety restores available early.
- 5Climb the Bonfire to level 4
Every level is both progression and protection: the ladder unlocks structures, and a lit fire is what keeps the Angler Fish away. Level 4 is the target because of what it unlocks next.
- 6Magnet — 30 Metal + 10 Wood, at Bonfire 4
It pulls in metal continuously — effectively infinite metal for the rest of the run. This is the moment scarcity stops being the enemy and the nights become the whole game. Only 26.8% of players ever reach the Bonfire level that unlocks it.
- 7Map Radar — stop sailing blind
Reveals the full map and marks islands. Worth building before any serious expedition phase, and effectively mandatory if you ever want the badge for visiting every island in a single session (39,794 players have).
- 8Auto Turret — the solo player's crew
Ghost raids are not an edge case: 61% of players have survived one, and that badge sits between the Day 1 and Day 5 badges, so the first raid arrives early. One player cannot watch every angle. The turret is the standing recommendation for anyone running alone.
- 9Container Shelter — the multiplier build
The reason experienced players grind this one is not housing: shelter count drives your day multiplier, with teams stacking five extra container buildings reporting x6 (per player footage, checked July 18). It appears to be blueprint-gated. We do not print a recipe for it — see below.
The Bonfire ladder, with real completion numbers
The Bonfire is the structure everything else hangs off, and the official Roblox badge list settles two things about it that no guide states plainly. First, the ladder runs from level 1 to level 7 and stops — the two badges numbered above that are feats rather than levels, which is how we know 7 is the cap. Second, because Roblox publishes an award count per badge, the drop-off between levels is measurable. We pulled the list on July 26, 2026; shares are against the 66,655,999 people who have ever launched the game.
| Level | Badge | Players | Share | What it means |
|---|---|---|---|---|
| Level 1 | Bonfire 1 | 55,873,500 | 83.8% | Almost everyone. The fire is lit before anything else is. |
| Level 2 | Bonfire 2 | 54,084,571 | 81.1% | Effectively free — barely anyone who reaches 1 stops at 1. |
| Level 3 | Bonfire 3 | 36,731,160 | 55.1% | Unlocks the Sawmill. Nearly half of all players never get here. |
| Level 4 | Bonfire 4 | 17,834,098 | 26.8% | The Magnet unlocks. About one in four players ever sees infinite metal. |
| Level 5 | Bonfire 5 | 7,292,888 | 10.9% | The point where a run has clearly gone well. |
| Level 6 | Bonfire 6 | 3,632,521 | 5.4% | Rare enough that most guides have never seen it. |
| Level 7 | Bonfire 7 | 2,197,774 | 3.3% | Max level. Only a handful of runs ever light it. |
| Level 7 (max) | Bonfire 7 | 2,196,871 | 3.3% | The cap. Everything above this is a feat, not a level. |
Three more Bonfire badges sit outside the ladder and are worth knowing as targets: burning 1,500 items in a single session (257,346 players — a fair measure of how much fuel a long run really consumes), reaching max level with four or more people (434,316), and reaching max level before Day 3, which 13,448 players have managed and which is about as pure a speedrun benchmark as this game has.
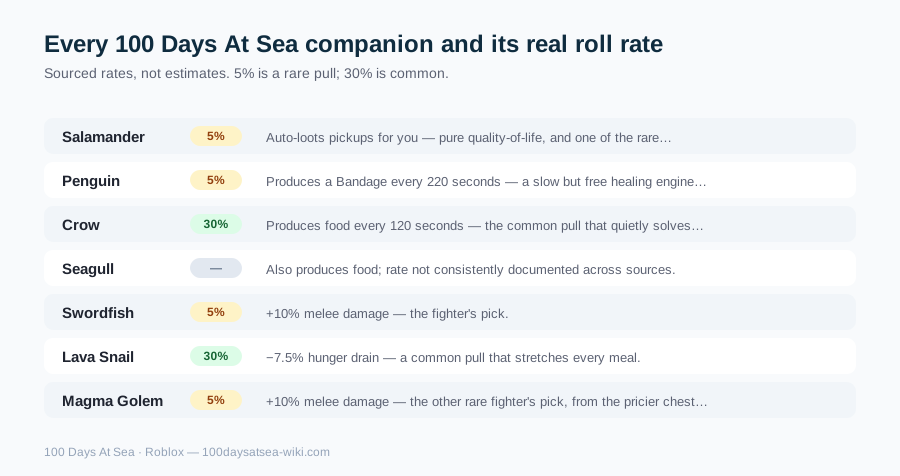
Companions (chest rolls, rates per Deltia's & PGG)
| Companion | Roll rate | Effect |
|---|---|---|
| Salamander | 5% | Auto-loots for you |
| Penguin | 5% | Produces a Bandage every 220s |
| Crow | 30% | Produces food every 120s |
| Seagull | — | Produces food |
| Swordfish | 5% | +10% melee damage |
| Lava Snail | 30% | −7.5% hunger drain |
| Magma Golem | 5% | +10% melee damage |
Chests are bought with Pearls; Magma and Pirate chests are the only ones with a published price, at 120 Pearls.
The three currencies and what each one is really for
100 Days At Sea runs three separate currencies, and mixing them up is a common way to waste a run. They are not interchangeable, and each has one primary sink:
- Pearls — earned from daily quests, badges, promo codes and chests. This is the account-level currency, and it buys the two things that persist: classes and companion chests. Classes first for most players, because a class is a guaranteed permanent kit while a chest is RNG.
- Coins — the trading currency, spent at the Mukumuku Market vendor when its icon appears on your map. That vendor sells Medkits, which makes Coins a health currency in practice.
- Doubloons — the treasure-chest currency, and the one the Treasure Hunter class boosts. The official badge list shows how far it scales inside a single run: 370,093 players have earned a badge for spending 1,000 Doubloons in one run, and there are separate badges for opening 100 chests in a run and 500 chests overall. Chests are also where guns come from — 19.4% of all players have pulled one out of a chest.
The practical read: Doubloons and Coins are in-run spending, Pearls are what you carry between runs. If you are saving toward a 750-Pearl class, nothing you do with Doubloons gets you there faster.
The recipes we deliberately don't print
Four of the six rows in our structures table read "—" in the recipe column. That is not an oversight, and it is not because the numbers are unavailable somewhere on the internet — it is because the places publishing them have a fabrication record.
The clearest example is the Container Shelter. A figure of "20 Scrap Metal + 10 Wood" circulates widely, and it traces back to a single auto-generated source that also invents promo codes and boss names for this game. We went looking for a player who had stated the real cost on camera or in comments and found none (checked July 18). The same family of sites publishes raft and structure recipes with the same provenance. Reprinting any of it would make our table longer and our site worth less.
Two recipes here are solid because a guide that actually played published them: the Sawmill at 10 Wood + 2 Metal, and the Magnet at 30 Metal + 10 Wood. For everything else, your in-game build menu shows the requirement directly and instantly — which is a better source than we are, until we have tested it ourselves. When we do, the number gets added here with the date it was verified.
FAQ
What are the currencies in 100 Days At Sea?
Three: Pearls (from daily quests, badges, codes and chests — spent mainly on Classes and companion chests), Coins (traded at the Mukumuku Market), and Doubloons (from treasure chests, boosted by the Treasure Hunter class).
What does the Harpoon do?
It's your signature starting tool — you hook floating planks, furniture, crates and even birds out of the sea with it. Nearly everything your early raft is built from arrives via harpoon.
How do companions work?
You buy companion chests with Pearls and roll rarity-based odds — the best pulls (Salamander, Penguin, Swordfish, Magma Golem) sit at 5%. Magma and Pirate chests are the only ones with a published price, at 120 Pearls.
What is Green Gum?
A craftable made by feeding Ghost Pirate corpses into the crafting machine — one of the game's stranger verified recipes (per Pro Game Guides' tested guide).