100 Days at Sea Tips — 10 That Actually Hold Up for Beginners
No filler, no invented mechanics — ten rules drawn from tested guides and cross-checked reports, ordered the way a first run actually unfolds.
- 1Harpoon everything, immediately
Planks, furniture, crates, even birds — the sea delivers your entire early economy past your raft. Every item you don't hook is a resource someone else's run gets.
Why it works: Wood and Metal drive every craft in the game, and both start out as things floating by. Anything you hook has two destinations: the crafting machine to build with, or the Bonfire to raise its level. 77.2% of players hold the badge for hooking a single object — the ones who go further are the ones who never stop.
- 2Sawmill first — and build two
10 Wood + 2 Metal, and it's Bonfire level 3 that unlocks it. The tested advice is to run two of them; slow planks are the #1 early bottleneck.
Why it works: Each cycle takes a few seconds and returns three planks, forever. Bonfire level 3 is also the first genuine wall in the game: 81.1% of players reach Bonfire 2 and only 55.1% reach Bonfire 3. Clearing that gate is most of what separates a run from a false start.
- 3A Crab Trap is free food forever
Set it once and hunger stops being a daily decision. Pair it with Cooked Bird (harpoon a bird, cook it) for the big top-ups.
Why it works: Starvation doesn't just drain a bar — it switches off your health regeneration first and then kills you outright. Passive food is really passive healing, which is why the tested build order puts the Crab Trap second, immediately after wood is solved.
- 4The Bonfire is your real health bar
It gates your structure progression AND keeps the Angler Fish away. Feeding it is never wasted effort — letting it die at night can end your run.
Why it works: Level 3 unlocks the Sawmill, level 4 unlocks the Magnet, and the flame itself is one of the Angler Fish's two trigger conditions. It's also the cheapest thing you own: you feed it the junk you were already fishing out of the sea.
- 5Never swim at night
Off the raft after dark (or with a dead Bonfire) puts the Angler Fish on you, and it does not stop chasing. If it's already on you, a Flare Gun is the escape rope.
Why it works: Pro Game Guides' tested guide uses the word 'only' — the Angler Fish appears only at night, and only when you're off the raft or the fire is out. Both conditions are yours to control, which makes it the rare major threat you can switch off entirely rather than out-fight.
- 6Rush the Magnet at Bonfire 4
30 Metal + 10 Wood buys effectively infinite metal for the rest of the run. Everything after this point is easier.
Why it works: Metal is the harder of the two core resources early: without the Magnet it means harpooning it out of the sea or hauling it home from islands in your sack. Only 26.8% of players have ever reached Bonfire 4 — almost exactly the share who have ever reached Day 10 (26.5%).
- 7Don't buy Survivor
It's 50 Pearls and tier lists call it the worst class in the game. At the same price, Medic at least starts every run with a Medkit.
Why it works: Pro Game Guides' tier list ranks Survivor bottom in plain words — 'the worst class in 100 Days at Sea that should be replaced as soon as you get the chance'. Medic isn't a powerhouse either, but it starts you holding the item a revive needs, and adds faster health regeneration on top.
- 8Fight the Night 6–7 aliens, don't hide
The invasion is repellable with melee, and the Transponder it yields unlocks Alien Island. It's a loot event wearing a horror costume.
Why it works: Individually the aliens die to a few hits of any melee weapon. Clearing the event hands you the Transponder, which reveals the location of Alien Island — described in the tested guide as high-tier loot. Skipping the fight costs you an island.
- 9In co-op, clear before you revive
A downed teammate has a bleed-out timer, but rushing in blind just gets you downed too. Clear or kite the threats, then pick them up.
Why it works: There are no mid-run respawns: when the timer expires that player is out for the remaining days. A botched revive therefore costs two players, not one — and in the game's badge data, the duo 100-day badge has been awarded roughly four times as often as the solo one.
- 10Solo? The Auto Turret is your co-op partner
Raid nights scale with the day counter, and one player can't watch every angle. The turret is the standing solo recommendation.
Why it works: The Travelling Merchant sells one for 150 Doubloons early in a run and it defends the base by itself overnight. Ghost raids reach most runs — 61% of players hold the badge for surviving one — so this is insurance against something the majority of runs meet, not an exotic edge case.
Why the first five tips are all about the first week
The order above isn't taste. Roblox publishes how many players hold each of a game's badges, and 100 Days At Sea has one for every ten-day milestone — so it's possible to see exactly where runs stop. We pulled the full badge list on July 26, 2026: 70.2% of players have survived Day 1, 46.5% have reached Day 5, and only 26.5% have ever seen Day 10.
Seven in ten players never get past the opening stretch — and the Bonfire ladder tells the same story from the other side, since 81.1% reach Bonfire 2 but only 55.1% reach Bonfire 3. Almost everything that ends a beginner's run happens before the Sawmill is up, which is why tips 1 to 5 are worth more than the rest put together. The full curve — including the surprising fact that the run gets easier the deeper you get into it — is on the day-by-day guide.
Never starve: the three food sources that work
Hunger is the quietest way to lose a run, because it kills your health regeneration before it kills you. Pro Game Guides' tested guide names three ways to stay fed, and they stack rather than compete:
- The fishing rod you start with.Throw the chip into the sea and click when prompted. It costs nothing and it's enough to keep you fed through the first few days, but it scales badly — treat it as a bridge, not a plan.
- The harpoon, again. Potatoes float past periodically. More valuably, birds fly over the raft during the day, and hitting one gives you Cooked Bird — which restores a large chunk of the satiety bar in a single use.
- Buildings.The Crab Trap drops a mix of fish and food on a short cooldown with no input from you; the Pizza Oven fills the same role. This is the only one of the three that keeps working while you're busy elsewhere.
One more use for the surplus: the Fisherman NPC on Fisherman Island trades high-tier loot — buildings, weapons and other valuables — for spare food, so an over-stocked larder converts directly into gear. And if you want proof that cooking runs deeper than it looks, the game has an official badge for cooking your first chowder in the cooking pot; 27.3% of players hold it.
Four “beginner tips” that are simply wrong
These circulate widely enough that new players arrive already believing them. Each one traces back to a site that has never played the game:
- “Build shelter to survive the storms.” No trusted source mentions storm weather in this game at all. Shelter is worth building — player footage ties shelter count to your day multiplier — but not for a weather system nobody can show you. See the container shelter page.
- “Survivor is the ideal starter class.” The tier list written by people who tested the classes puts it dead last and says to replace it as soon as you can.
- “Use these codes for free Pearls.” Three strings — SEAADVENTURE, STRANDEDDEVS and 100DAYS — are published as working codes and appear in none of the trusted trackers. Real codes expire in roughly two to three weeks, which is why our codes page carries dates.
- “Start with the best seed.”We could find no evidence a seed input exists in this game; the demand appears to spill over from Minecraft's 100-days video genre. Every “best seeds” article we read fails to name a single seed value — the full check is here.
Where your first Pearls should go
Pearls are earned free — daily quests, achievements and badges, the occasional code — and they buy classes in the lobby. Pro Game Guides rates classes on a one-to-six star scale and calls the five- and six-star ones the most impactful; every six-star class it names costs 750 Pearls. So your first purchase is really a question of what you can afford now versus what you're saving toward.
One number worth knowing before you spend: Treasure Hunter is listed with 100 Doubloons and extra sack slots, and a second listing gives 150 Doubloons and six slots — the gap matching what its level 2–4 perks add. The Travelling Merchant sells the Auto Turret for 150 Doubloons, so a fully-levelled Treasure Hunter is plausibly one purchase away from it out of the lobby. Plan around the 100 figure until you have levelled the class; that is the one every listing agrees on.
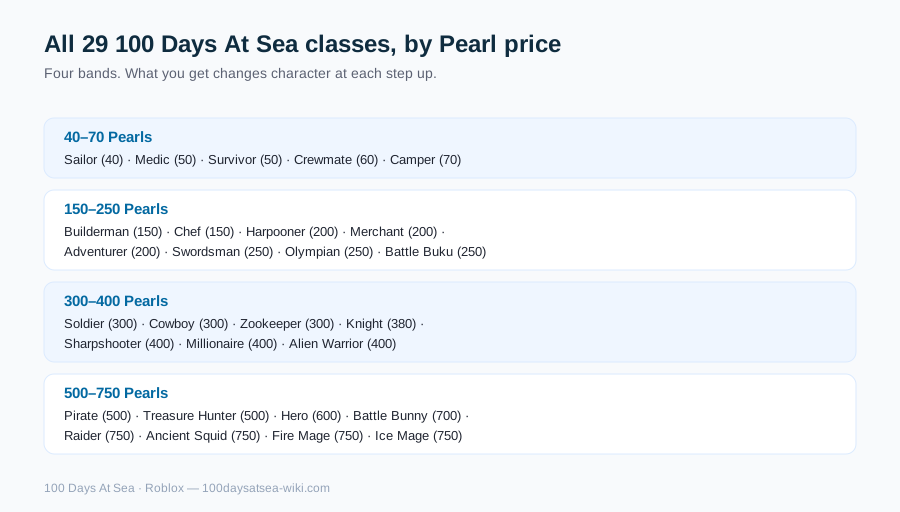
The full price ladder — all four bands, and what changes as you climb them — is on the classes page. If you're short of Pearls, live codes are listed with dates on the codes page; each one has been worth 20 Pearls so far, so codes are a top-up rather than a shortcut.
100 Days at Sea tips — FAQ
What should I do first in 100 Days At Sea?
Harpoon floating resources non-stop, get a Sawmill running within the first days (10 Wood + 2 Metal), add a Crab Trap for passive food, and keep the Bonfire fed. That foundation carries you to the Magnet at Bonfire level 4.
How do I not die at night?
Stay on the raft and keep the Bonfire lit — those are the two Angler Fish triggers. Raid nights are a separate threat that scales with your day counter, which is what walls and the Auto Turret are for.
What's the biggest beginner mistake?
Treating the Bonfire as decoration. It gates your building progression and its flame is the only thing standing between you and the Angler Fish — most early deaths trace back to an unfed fire.
Is 100 Days At Sea better solo or with friends?
Both are viable. Co-op trivializes revives and raid defense; solo leans on the Auto Turret and tighter Bonfire discipline. The revive rules are the big practical difference — solo, a knock-down usually ends the run. The game's official badge list shows the duo 100-day badge awarded roughly four times as often as the solo one.
How far do most players get in 100 Days At Sea?
Not far. Per the game's official Roblox badge statistics (checked July 26, 2026), 70.2% of players have survived Day 1, 46.5% have reached Day 5, 26.5% have reached Day 10 and only 1.3% hold the Day 100 badge. The steepest stretch is Day 10 to Day 20, which only 45% of Day-10 survivors clear.
How do I stop starving in 100 Days At Sea?
Three sources, and they stack: the fishing rod you start with (free, but it scales badly), the harpoon (floating potatoes, plus birds overhead that give Cooked Bird — a big satiety restore), and buildings like the Crab Trap or Pizza Oven, which produce food on a cooldown without you doing anything. Starvation kills your health regeneration before it kills you, so this is a healing problem as much as a food one.